Tekla Structural Designer (TSD) is a simple, integrated design & analysis software that enables engineers to deliver safe, effective and rationalized design more quickly, regardless of structural material. Reinforcement drawings for the entire building or tonnes of steel for estimating, all available in a touch of a button.
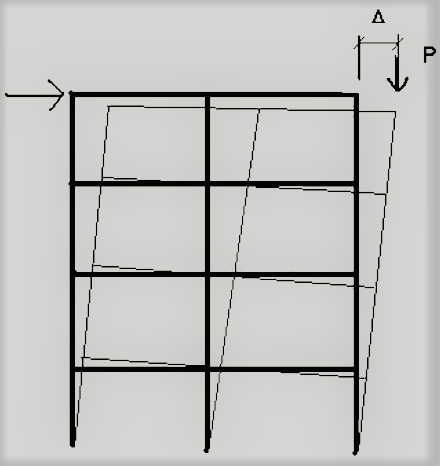
We now know that TSD has the option of both linear and non-linear 2nd order methods of analysis, both types will give P-Δ and P-δ (P-Delta) effects as you can see in the diagram given below.
Today we came with the most wanted topic on Tekla Structural Designer and the topic is Can we do P-Delta Analysis on TSD?
So the answer is Yes
So before going to start the process let's know about the meaning of P-Delta in Structural Analysis.
In regard to structural Engineering, P-Delta analysis involves geometric nonlinearity, and the effect relates to the sudden changes in shear, moment etc. at the structure base. Equilibrium compatibility relations of a structural system loaded in its deflected configuration is involved here.
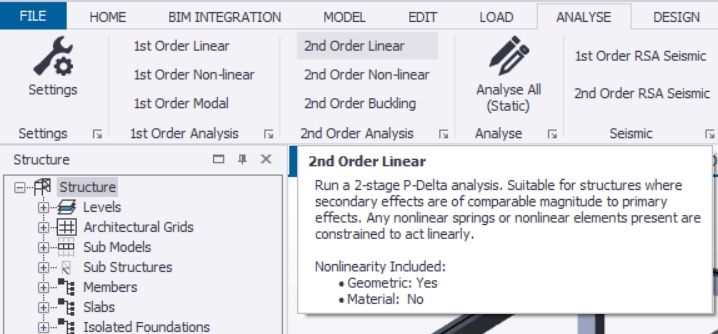
Let's discuss the process. For starting you need to make sure that the building model and assigning of loads is complete in TSD
Open the TSD workframe then click “Analyse” then you will find option "2nd Order" click there and select combination unique and select all the combinations and click OK. After this the analysis of structure will be done.
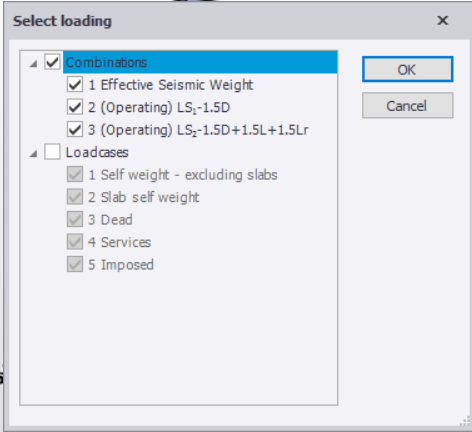
Select the load combinations and click OK. After this the analysis of structure will be done.
As a result you will find Axial Load. Shear force, Reactions, Moments etc. and it's values.
So this is all about P-Delta Analysis in Tekla Structural Designer.
Watch this video to know more about this topic: https://youtu.be/M8NuggCJY1A
About us: Civil Center is a Civil Engineering Consultancy company which provides services ranging from Building Consultancy Services like Architectural Plan, Structural Drawing, Estimation, 3D Views of Interior and Exterior of a Building, Construction Planning and Management, and also other services like Survey Investigation Works.

We also provide industrial Training to Civil Engineering Students as well as professionals which include courses on Building Design, Detailing Estimation, 3D Modelling and Survey by using Software like STAAD. Pro, Tekla Structural Designer, Revit Structures, Tekla Structures, MS Excel, E-Survey. In training our goal is to make our trainees ready for the industry by getting them trained in Live Projects. We also provide placement assistance to our trainees.
To join our live classes on Tekla Structural Designer and other courses related to Civil Engineering, click here : https://forms.gle/Yy9j8BH8zZzmFfZMA
For any query
Call on: 8433248864
WhatsApp: +91 6372905201
Email: team@civilcenter.in
If you have any requirement of Building Consultancy Services like Architectural Plan, Structural Drawings etc., register using the link given below
https://forms.gle/M4MTqgcLP6ZEp4rs7
Whatsapp: +91 6372905201
Email: enquiry@civilcenter.in
Visit our Website: http://www.civilcenter.in/
Visit our Website: http://www.civilcenter.in/
You Can Find Us On Other Social Media
Visit our Facebook Page: https://www.facebook.com/civilcenter/
Visit our LinkedIn Page: https://www.linkedin.com/company/civil-center
Follow our Twitter Handle: https://twitter.com/_CivilCenter
Follow us on Instagram: https://www.instagram.com/civilcenter17/
Comments
Post a Comment